Configure Nginx Server Blocks on Ubuntu Linux
This tutorial will show you all the steps required to configure Nginx Server Blocks on Ubuntu Linux.
Nginx Server Blocks is very much the same as Apache Virtual host feature.
This tutorial was tested on Ubuntu 18.04.
1. Install Nginx on Ubuntu Linux
Use the Ubuntu APT command to install the Nginx server.
# apt-get update
# apt-get install nginx
Restart the Nginx web server manually.
# service nginx restart
# service nginx status
Verify the Nginx service status.
● nginx.service – A high performance web server and a reverse proxy server
Loaded: loaded (/lib/systemd/system/nginx.service; enabled; vendor preset: enabled)
Active: active (running) since Sat 2018-12-29 04:29:22 UTC; 1h 17min ago
Docs: man:nginx(8)
Process: 2233 ExecStart=/usr/sbin/nginx -g daemon on; master_process on; (code=exited, status
Process: 2221 ExecStartPre=/usr/sbin/nginx -t -q -g daemon on; master_process on; (code=exite
Main PID: 2238 (nginx)
Tasks: 2 (limit: 1152)
CGroup: /system.slice/nginx.service
├─2238 nginx: master process /usr/sbin/nginx -g daemon on; master_process on;
└─2239 nginx: worker process
You finished the Nginx Web server installation on Ubuntu Linux.
2. Add PHP support to Nginx
Nginx needs an external program to add PHP support.
Use the Ubuntu APT command to install the PHP required packages.
# apt-get update
# apt-get install php7.2-fpm
Optional. Use the following command to install the most used PHP modules.
# apt-get install php7.2-xml php7.2-curl php7.2-gd php7.2-mbstring php7.2-mysql
# apt-get install php7.2-bz2 php7.2-zip php7.2-json php7.2-readline
Find the location of the PHP configuration file on your system.
Edit the php.ini configuration file.
# updatedb
# locate php.ini
# vi /etc/php/7.2/fpm/php.ini
Your PHP version may not be the same as ours.
Your PHP configuration file location may not be the same as ours.
Here is the file with our configuration.
file_uploads = On
max_execution_time = 300
memory_limit = 256M
post_max_size = 32M
max_input_time = 60
max_input_vars = 4440
upload_max_filesize = 32M
Edit the Nginx default website configuration file.
# vi /etc/nginx/sites-available/default
Here is the original file, before our configuration.
server {
listen 80 default_server;
listen [::]:80 default_server;
root /var/www/html;
index index.html index.htm index.nginx-debian.html;
server_name _;
location / {
try_files $uri $uri/ =404;
}
}
Here is the new file with our configuration.
server {
listen 80 default_server;
listen [::]:80 default_server;
root /var/www/html;
index index.php index.html index.htm;
server_name _;
location / {
try_files $uri $uri/ =404;
}
location ~ .php$ {
include snippets/fastcgi-php.conf;
fastcgi_pass unix:/var/run/php/php7.2-fpm.sock;
}
}
Verify if your Nginx configuration file has no error.
# nginx -t
nginx: the configuration file /etc/nginx/nginx.conf syntax is ok
nginx: configuration file /etc/nginx/nginx.conf test is successful
Restart the PHP service.
Restart the Nginx service.
# service php7.2-fpm restart
# service nginx restart
You finished the Nginx integration with PHP on Ubuntu Linux.
3. Configure Nginx Server Blocks
Server blocks is a feature that allows one Nginx server to offer multiple websites using the same IP address.
Lets’ create the necessary infrastructure to use the Nginx Server blocks feature.
# mkdir /websites/mining-pool -p
# cd /websites/mining-pool
# mkdir www
# chown www-data.www-data /websites -R
Our website will be named mining-pool.ninja.
The mining-pool.ninja website files should be inside the /websites/mining-pool/www directory.
Alert!
You need to change your configuration files to reflect your website name.
Create a Nginx Virtualhost configuration file to your website.
# vi /etc/nginx/sites-available/mining-pool.conf
Here is the file with our configuration.
server {
listen 80;
listen [::]:80;
root /websites/mining-pool/www;
index index.php index.html index.htm;
server_name mining-pool.ninja;
location / {
try_files $uri $uri/ =404;
}
location ~ \.php$ {
include snippets/fastcgi-php.conf;
fastcgi_pass unix:/var/run/php/php7.2-fpm.sock;
}
}
Create a symbolic link to enable the Nginx virtual host configuration.
Restart the Nginx service.
# ln -s /etc/nginx/sites-available/mining-pool.conf /etc/nginx/sites-enabled/
# service nginx restart
You finished the Nginx Server block configuration.
4. Configure The DNS Domain
Access the GODADDY WEBSITE and purchase a DNS domain.
In our example, we purchase the domain named MINING-POOL.NINJA.
You can use any website to purchase a DNS domain, GoDaddy is just my personal choice.
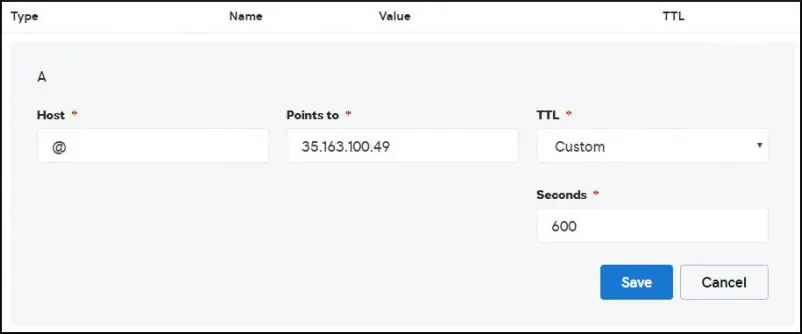
Create a DNS entry pointing your website to the computer running Nginx.
In our example, we created a DNS entry pointing the domain MINING-POOL.NINJA to the IP address 35.163.100.49.

Use the NSLOOKUP command to test your DNS configuration
# apt-get update
# apt-get install dnsutils
# nslookup mining-pool.ninja
Non-authoritative answer:
Name: mining-pool.ninja
Address: 35.163.100.49
You finished the DNS domain configuration.
To test our configuration, let’s create a basic PHP test page.
# vi /websites/mining-pool/www/index.php
Here is the content of the index.php file.
<?php phpinfo(); ?>
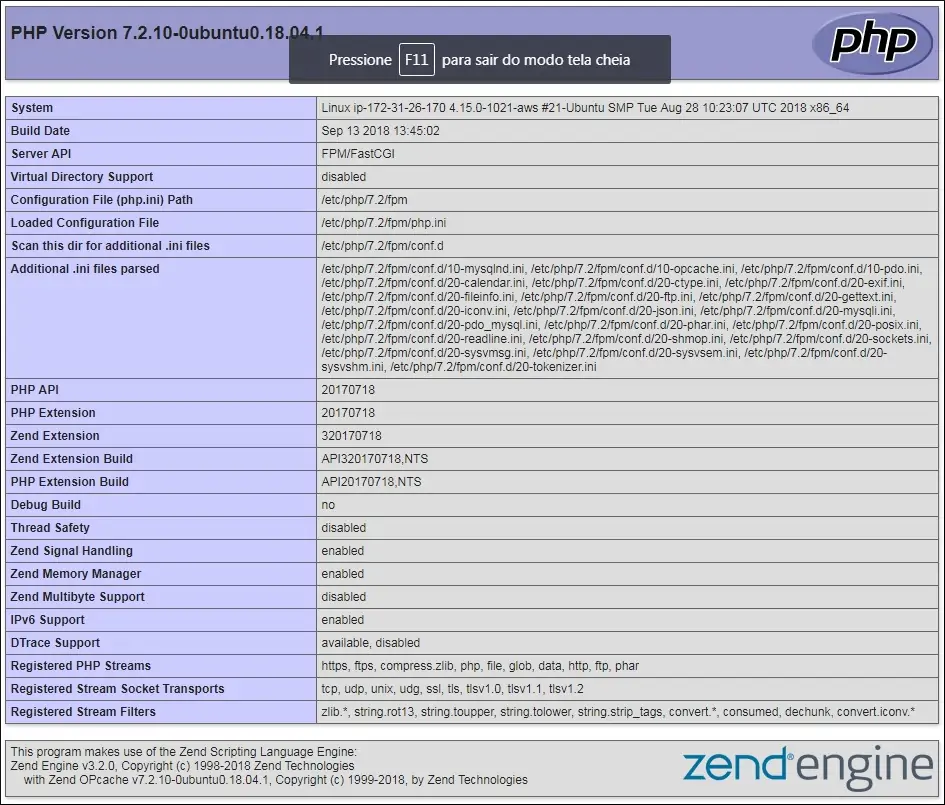
Open your browser and try to access the HTTP version of your website.
In our example, the following URL was entered in the Browser:
• http://mining-pool.ninja
The PHP information page should be presented.


Leave A Comment
You must be logged in to post a comment.