Installeren van WordPress met Nginx op Ubuntu Linux
Deze tutorial zal je alle stappen laten zien die nodig zijn om WordPress met Nginx op Ubuntu Linux te installeren.
Deze tutorial is getest op Ubuntu 18.04.
1. Installeer Nginx op Ubuntu Linux
Gebruik de opdracht Ubuntu APT om de Nginx-server te installeren.
# apt-get update
# apt-get install nginx
Bewerk het configuratiebestand nginx.conf.
Voeg client_max_body_size toe aan de HTTP-sectie.
Stel de maximale uploadgrootte in op 32 Megabytes.
# vi /etc/nginx/nginx.conf
Hier is het bestand met onze configuratie.
user www-data;
worker_processes auto;
pid /run/nginx.pid;
include /etc/nginx/modules-enabled/*.conf;
events {
worker_connections 768;
}
http {
client_max_body_size 32M;
sendfile on;
tcp_nopush on;
tcp_nodelay on;
keepalive_timeout 65;
types_hash_max_size 2048;
include /etc/nginx/mime.types;
default_type application/octet-stream;
ssl_prefer_server_ciphers on;
access_log /var/log/nginx/access.log;
error_log /var/log/nginx/error.log;
gzip on;
include /etc/nginx/conf.d/*.conf;
include /etc/nginx/sites-enabled/*;
}
Start de Nginx-webserver handmatig opnieuw.
# service nginx restart
# service nginx status
Controleer de Nginx-servicestatus.
● nginx.service – A high performance web server and a reverse proxy server
Loaded: loaded (/lib/systemd/system/nginx.service; enabled; vendor preset: enabled)
Active: active (running) since Sat 2018-12-29 04:29:22 UTC; 1h 17min ago
Docs: man:nginx(8)
Process: 2233 ExecStart=/usr/sbin/nginx -g daemon on; master_process on; (code=exited, status
Process: 2221 ExecStartPre=/usr/sbin/nginx -t -q -g daemon on; master_process on; (code=exite
Main PID: 2238 (nginx)
Tasks: 2 (limit: 1152)
CGroup: /system.slice/nginx.service
├─2238 nginx: master process /usr/sbin/nginx -g daemon on; master_process on;
└─2239 nginx: worker process
De Nginx-webserver is met succes geïnstalleerd.
2. Installeer MySQL op Ubuntu Linux
WordPress vereist een databasesysteem om alle configuratie op te slaan.
Gebruik de opdracht Ubuntu APT om de MySQL-server te installeren.
# apt-get update
# apt-get install mysql-server mysql-client
Gebruik de volgende opdracht om toegang te krijgen tot de MySQL-serviceconsole.
# mysql -u root -p
In de MySQL-console moet u de volgende taken uitvoeren:
• Maak een database met de naam wordpress.
• Maak een MySQL-gebruikersaccount met de naam wordpress.
• Geef volledige controle over de wordpress-database aan de gebruiker van wordpress.
CREATE DATABASE wordpress CHARACTER SET UTF8 COLLATE UTF8_BIN;
CREATE USER ‘wordpress’@’%’ IDENTIFIED BY ‘kamisama123’;
GRANT ALL PRIVILEGES ON wordpress.* TO ‘wordpress’@’%’;
FLUSH PRIVILEGES;
quit;
3. Voeg PHP-ondersteuning toe aan Nginx
Nginx heeft een extern programma nodig om PHP-ondersteuning toe te voegen.
Gebruik de opdracht Ubuntu APT om de vereiste PHP-pakketten te installeren.
# apt-get update
# apt-get install php7.2-fpm
Gebruik de volgende opdracht om de vereiste PHP-modules te installeren.
# apt-get install php7.2-xml php7.2-curl php7.2-gd php7.2-mbstring php7.2-readline
# apt-get install php7.2-bz2 php7.2-zip php7.2-json php7.2-opcache
Zoek de locatie van het PHP-configuratiebestand op uw systeem.
Bewerk het php.ini-configuratiebestand.
# updatedb
# locate php.ini
# vi /etc/php/7.2/fpm/php.ini
Uw PHP-versie is misschien niet hetzelfde als die van ons.
Uw PHP-configuratiebestandslocatie is mogelijk niet dezelfde als die van ons.
Hier is het bestand met onze configuratie.
file_uploads = On
max_execution_time = 300
memory_limit = 256M
post_max_size = 32M
max_input_time = 60
max_input_vars = 4440
upload_max_filesize = 32M
Bewerk het standaardwebsiteconfiguratiebestand van Nginx.
# vi /etc/nginx/sites-available/default
Hier is het originele bestand, vóór onze configuratie.
server {
listen 80 default_server;
listen [::]:80 default_server;
root /var/www/html;
index index.html index.htm index.nginx-debian.html;
server_name _;
location / {
try_files $uri $uri/ =404;
}
}
Hier is het nieuwe bestand met onze configuratie.
server {
listen 80 default_server;
listen [::]:80 default_server;
root /var/www/html;
index index.php index.html index.htm;
server_name _;
location / {
try_files $uri $uri/ =404;
}
location ~ .php$ {
include snippets/fastcgi-php.conf;
fastcgi_pass unix:/var/run/php/php7.2-fpm.sock;
}
}
Controleer of uw Nginx-configuratiebestand geen fout bevat.
# nginx -t
nginx: the configuration file /etc/nginx/nginx.conf syntax is ok
nginx: configuration file /etc/nginx/nginx.conf test is successful
Start de PHP-service opnieuw.
Start de Nginx-service opnieuw.
# service php7.2-fpm restart
# service nginx restart
4. Installeer WordPress op Ubuntu Linux
Nadat de MySQL- en de Apache-configuratie zijn voltooid, kunnen we de installatie van WordPress starten.
Download de nieuwste versie van WordPress en pak het pakket uit.
# cd /tmp
# wget https://wordpress.org/latest.tar.gz
# tar -zxvf latest.tar.gz
Verplaats de WordPress-map naar de hoofdmap van uw Apache-hoofdmap.
Geef de gebruiker van www-data de volledige controle over de WordPress-map en de bijbehorende bestanden.
# mv wordpress /var/www/html/
# chown www-data.www-data /var/www/html/wordpress/* -R
Maak en bewerk het WordPress-configuratiebestand wp-config.php.
# cd /var/www/html/wordpress
# mv wp-config-sample.php wp-config.php
# vi wp-config.php
Bewerk de MySQL-databaseverbindingsinformatie in het wp-config.file.
Als voorbeeld is hier het bestand met onze configuratie.
define(‘DB_NAME’, ‘wordpress’);
define(‘DB_USER’, ‘wordpress’);
define(‘DB_PASSWORD’, ‘kamisama123’);
define(‘DB_HOST’, ‘localhost’);
define(‘DB_CHARSET’, ‘utf8’);
define(‘DB_COLLATE’, ”);
Configureren van WordPress op Ubuntu Linux
Open uw browser en voer het IP-adres van uw webserver plus / wordpress in.
In ons voorbeeld is de volgende URL in de browser ingevoerd:
• http:/.200.200.200/wordpress
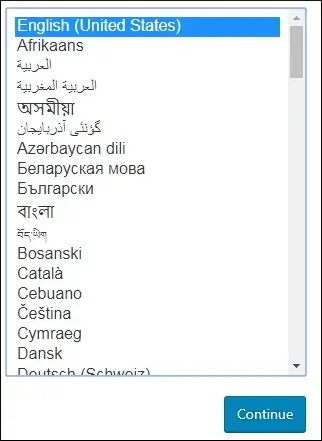
De WordPress-installatiewizard zal worden gepresenteerd.

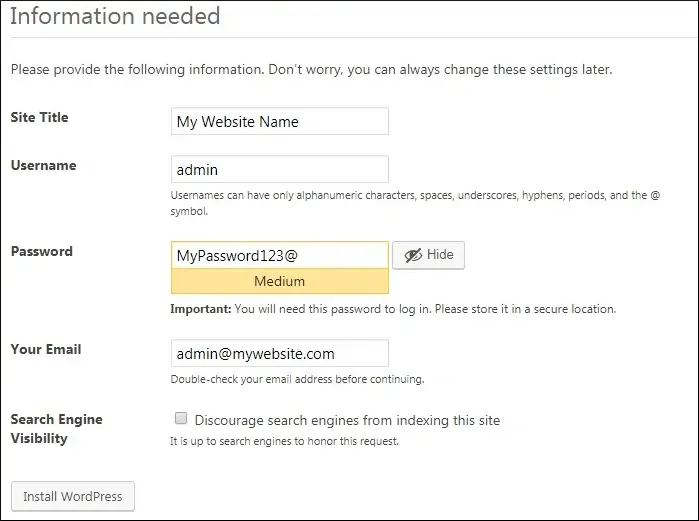
Op het volgende scherm moet u uw website-informatie invoeren.

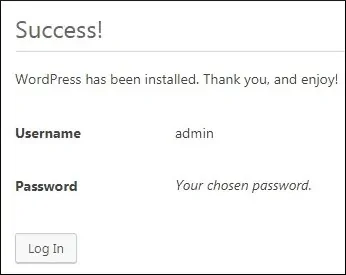
Op het volgende scherm ontvangt u de bevestiging van uw WordPress-installatie.

Klik op de knop Inloggen en voer het beheerdersaccount en wachtwoord in.
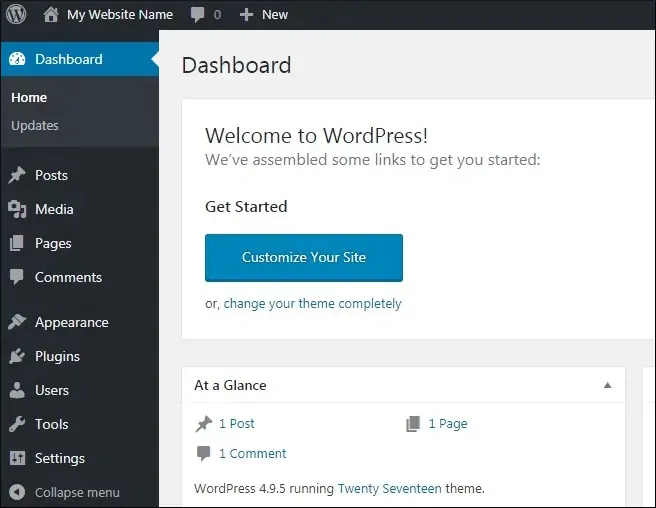
Na een succesvolle aanmelding wordt het WordPress-dashboard weergegeven.


Leave A Comment
You must be logged in to post a comment.